728x90
반응형
jquery는 javascript를 배우면서 맛보기 정도로 조금씩 배우는 중이다.
배우고 있는 내용들을 위주로 정리하고 있지만 정확하거나 자세한 내용은 아닐 수 있다..
1. text(), addClass(), val()
1) text()
- text() : 텍스트를 읽어오기
- text("문자") : 텍스트를 추가하기
2) addClass() : 클래스 속성 추가하기
3) val() : 요소의 값을 가져오기
코드예시)
<style>
	.inputcls{
		padding: 5px;
		border: 1px solid gray;
		width: 400px;
		background-color: blue;

	}
</style>

<body>
    p태그의 innerText 입력 :
    <input type="text" id="txtMsg" name="txtMsg" autofocus="autofocus" value="안녕">
    <br>
    <button>Click Me!</button>

    <p id="demo"></p>

<script>
	$("h3").text($("h3").text() + "- html 내용을 js로 변경");
	// $("h3").text() : 텍스트를 읽어 오는 것
	// $("h3").text("문자") : 텍스트를 추가 하는 것

	$("#txtMsg").addClass("inputcls"); // inputcls 클래스 속성 추가

    // 버튼 클릭시 함수 이벤트 발생
	$("button").click(function (event) {
    	// demo ID를 가진 요소에 txtMsg ID를 가진 요소의 값을 텍스트로 추가하겠다.
		$("#demo").text($("#txtMsg").val());
	});

</script>
</body>
결과)

2. attr(), prop(), next(), prev()
- attr(), prop() : 속성 변경 가능한 기능은 동일(차이점은 있는데 jquery 본격적으로 수업 하실 때 알려주실 예정)
ex) attr("속성명", "속성값") / prop("속성명", "속성값")
- prev() : 이전에 위치한 형제 요소 선택
- next() : 다음에 위치한 형제 요소 선택
코드예시)
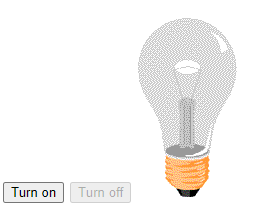
<body>

    <input disabled="disabled">

    <h3>html 요소 속성 변경(jq)</h3>

    <button class="bulb_on">Turn on</button>
    <button disabled="disabled" class="bulb_off">Turn off</button>

    <img src="../images/pic_bulboff.gif" alt="" id="imgbulb">

<script>
// 1번째 코딩
 	$(".bulb_on").click(function (event) {

		$("#imgbulb").attr("src", "../images/pic_bulbon.gif");
		// $("button:first-of-type").attr("disabled", true);
		// $(this).prop("dosabled", true);

		// $("button:last-of-type").attr("disabled", false);
		// $("button:last-of-type").prop("disabled", false);
		// $(this).next().prop("dosabled", false);

        // 위의 코딩 한 줄 코딩으로 변경
        // on 버튼의 disabled 속성을 활성화 시키고 on 버튼의 다음 형제 요소(off 버튼)의 disabled는 비활성화 시키겠다.
		$(this).prop("disabled", true).next().prop("disabled", false);

	});

	$(".bulb_off").click(function (event) {
		$("#imgbulb").attr("src", "../images/pic_bulboff.gif");
		$("button:first-of-type").attr("disabled", false);
		$("button:last-of-type").attr("disabled", true);
	});
</script>

<script>
// 2번째 코딩
 	$(".bulb_on").click(function (event) {

		$("#imgbulb").attr("src", "../images/pic_bulbon.gif");
		$("button:first-of-type").attr("disabled", true);
		$("button:first-of-type").next().attr("disabled", false);
	});

	$(".bulb_off").click(function (event) {
		$("#imgbulb").attr("src", "../images/pic_bulboff.gif");
		$("button:last-of-type").attr("disabled", true);
		$("button:last-of-type").prev().attr("disabled", false);
	});
</script>
</body>
결과)

3. 스타일 변경하기(css)
- 선택자.css("속성명", "속성값");
- 선택자.css({ "속성명" : "속성값", "속성명":"속성값", "속성명":"속성값", "속성명":"속성값" .... });
코드예시)
<style>
	.demostyle{
		color: red;
		font-size: 35px;
		border: 1px solid gray;
	}
</style>

<body>

<button>스타일 변경</button>

<p id="demo">Lorem ipsum dolor sit amet, consectetur adipisicing elit. Repellendus laborum illo quasi eveniet et recusandae?</p>

<script>
	$("button").click(function (event) {
    // 1번째 코딩
 		$("#demo").css("color", "red");
		$("#demo").css("font-size", "35px");
		$("#demo").css("border", "1px solid gray");

     // 2번째 코딩
 		$("#demo")
			.css("color", "red")
			.css("font-size", "35px")
			.css("border", "1px solid gray");

        // 3번째 코딩
		$("#demo").css({"color":"red", "font-size":"35px", "border":"1px solid gray"});

	});

</script>
</body>
결과)


728x90
반응형
'TIL > Web(HTML, CSS, JS, jQuery)' 카테고리의 다른 글
| [SIST] Web_javascript_days01 복습 (0) | 2022.05.30 |
|---|---|
| [SIST] Web_javascript_days02 (0) | 2022.05.30 |
| [SIST] Web_javascript_days01_클래스 속성 추가, 스타일 / 속성 추가 및 변경, 문자 추가 및 변경, 라디오버튼 / 체크박스 체크 값 가져오기 (0) | 2022.05.28 |
| [SIST] javascript / jquery 맛보기(내용 배울 때마다 추가 중..) (0) | 2022.05.26 |
| [SIST] Web_CSS_days06_CSS 애니메이션 효과 (0) | 2022.05.26 |