[javascript 사용했던 것들]
- var 변수명 : 변수 선언 형식
- 함수 처리할 때는 태그에 함수명(); 이라고 선언 후 script 태그 안에서 함수를 선언
ex)
	<div id="imgbox1" class="imgbox">
		Box1 <img src="../images/img_5terre.jpg" alt="" />
		<button onclick="remove();">Remove</button>
		<script>
			function remove() {
				document.getElementById("imgbox1").style.display = "none";
			}
		</script>
	</div>
- 이벤트를 처리하는 방법 2가지
1) 각각의 요소에 on이벤트명 속성에 ="이벤트가 발생할 때 호출되는 함수명();
2) 태그에 id 속성을 준 뒤에 script 태그 안에서 변수 선언후 변수.onclick으로 처리하기
ex)
<p onclick="p_click();">Lorem ipsum dolor sit amet.</p>

<script>
	// 이벤트 처리하는 1번째 방법 : 각각의 요소에 on이벤트명 속성에 ="이벤트가 발생할 때 호출되는 함수명();"
	function p_click(){
		alert("p_click")
	}

	// 이벤트 처리 2번째 방법
	var h2elemt = document.getElementById("tne");
	h2elemt.onclick = function (){ // 함수명이 없는 것 == 익명(무명) 함수
		alert("h2_click")
	}
</script>
- document.getElementsById("아이디명") : 아이디명에 해당하는 요소를 가져오겠다.
- document.getElementsByTagName("태그명") : 태그명에 해당하는 모든 태그들을 가져오겠다.
- querySelector(선택자) : 1개의 요소만 가져온다.
- querySelectorAll(선택자)
> document.querySelectorAll("div.topnav a") == div 태그 안에 topnav 클래스 안에 있는 모든 a태그를 가져오겠다.
- classList : javascript에서 클래스 속성을 추가할 때 사용
- classList.remove("클래스명") : 클래스명에 해당하는 클래스 속성을 제거하겠다.
- document.createElement("태그명") : 요소를 생성하겠다.
- 변수명.innerText = "문자" : 변수에 들어있는 요소에 text를 추가하겠다.
- appendChild() : 노드를 자식노드로 넣겠다.
ex) document.body.appendChild(btn) == 생선된 버튼을 body 요소의 자식으로 추가하겠다.
- add("클래스명") : 클래스 속성을 추가하겠다.
- style.스타일속성 = "속성값" : 자바스크립트로 속성 값을 줄 때는 무조건 문자열로!
ex) document.getElementById("imgbox1").style.display = "none";
- document.getElementById("아이디명").style.속성명 : 아이디에 해당하는 속성 값을 가져오는 것
- document.createTextNode(자식노드로들어갈문자열노드) : 자식 노드에 문자열 노드를 추가하겠다.
- onmouseover : 마우스를 올렸을 때
- onmouseout : 마우스가 요소에서 벗어났을 때
- 스타일 속성 명에 - 가 들어가 있는 것은 - 를 빼고 - 뒤에 오는 문자를 대문자로 변경해야한다.
ex) margin-left => marginLeft
- event : 모든 이벤트가 발생할 때 마다 일어나는 이벤트 정보를 저장하는 객체
- event.srcElement : 어떤 요소가 이벤트를 발생시켰는지 알아오는 방법
- event.srcElement.parentElement : 어떤 요소가 이벤트를 발생시켰고 그 요소의 부모 요소를 알아오는 방법
- this
<div class="chip">
<img src="../images/img_avatar.png" alt="" />
Hong Gil Dong
<span class="closebtn" onclick="chip_close(this);">×</span>
</div>
<!-- js코딩 -->
<script>
// 아래 코딩
/* document.querySelector(".closebtn").onclick = function name() {
// alert("XX")
this.style.display = "none";
} */
function chip_close(spn) {
// span 태그에서 onclick시 함수 발생할 때 this(자기자신)를 추가한 뒤 spn이라는 변수명을 집어넣고 56라인에 있는 span 태그를 말함
spn.style.display = "none"; // this.style.display 에서 this는 span 태그가 아님
}
</script>
- setTimeout() / setInterval() : 일정한 시간 간격으로 반복적 실행하는 메서드
- clearInterval() : setInterval을 중단하는 메서드
[jquery 사용했던 것들]
- jquery 코딩으로 처리하려면 태그에 id명이나 class 명을 주어야 한다.
<body>
    <div id="imgbox1" class="imgbox">
        Box1
        <img src="../images/img_5terre.jpg" alt="" />
        <button onclick="remove();">Remove</button>
    </div>

    <div id="imgbox2" class="imgbox">
        Box2
        <img src="../images/img_5terre.jpg" alt="" />
        <button id="btnHide">Hide</button>
    </div>

    <div id="imgbox3" class="imgbox">
        Box3
        <img src="../images/img_5terre.jpg" alt="" />
        <button>Reset All</button>
    </div>
</body>

<script>
	$("#imgbox1 button").click(function (event) {
		// $("#imgbox1").css("display", "none");
		$("#imgbox1").hide();
	});

	$("#imgbox2 button").click(function (event) {
		$("#imgbox2").css("visibility", "hidden");
	});

	$("#imgbox3 button").click(function (event) {
		// $("#imgbox1").css("display", "block");
		$("#imgbox1").show();
		$("#imgbox2").css("visibility", "visible");
	});
</script>
- $("선택자") : 요소를 모두 가져옴
ex) $("div.topnav a") == var links = document.querySelectorAll("div.topnav a") 동일한 코딩
topnav 클래스명을 가진 div 태그 자식 중 a 태그
- removeClass("클래스명") : 클래스명에 해당하는 클래스 속성을 제거하겠다.
ex) $("div.topnav a").removeClass("active"); // 모든 a태그의 클래스 속성 제거(클래스 제거)
- addClass("클래스명") : 클래스명에 해당하는 클래스 속성을 추가하겠다.
- not() : 제외하겠다.
- show() : 보여주겠다는 함수
- hide() : 안보이게 하겠다는 함수
- css("속성명", "속성값") : jquery에서 css를 설정하는 법
- click() : 클릭 이벤트가 발생했을 때
- toggle() : 보였다가 안보였다가 하는 함수
- append() : 추가하겠다는 함수
- mouseover() : 마우스를 올렸을 때
- mouseout() : 마우스가 영역을 벗어났을 때
No.1 - 메뉴를 클릭하면 클리한 메뉴의 색상 바꾸기
[javascript 코드 예시]
<!DOCTYPE html>
<html>
<head>
<meta charset="UTF-8">
<meta name="viewport" content="width=device-width, initial-scale=1.0">
<link rel="shortcut icon" type="image/x-icon" href="../images/SiSt.ico">
<script src="https://ajax.googleapis.com/ajax/libs/jquery/3.6.0/jquery.min.js"></script>
<title>2022. 5. 23. - 오전 9:35:44</title>
<style>
body {
margin: 0;
}
.topnav{
background-color: #333;
overflow: auto;
}
.topnav a{
color: #f2f2f2;
text-decoration: none;
float: left;
padding: 14px 16px; /* 패딩주니 내비 크기 커졌음 */
text-align: center;
}
.topnav a:hover{
background-color: #ddd;
color: black;
}
.topnav a.active{
background-color: #4caf50;
color: white;
}
</style>
</head>
<body>
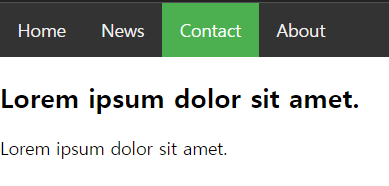
<div class="topnav">
<a href="#" class="active">Home</a>
<a href="#">News</a>
<a href="#">Contact</a>
<a href="#">About</a>
</div>
<div>
<h2 id="tne">Lorem ipsum dolor sit amet.</h2>
<p onclick="p_click();">Lorem ipsum dolor sit amet.</p>
</div>
<script>
// 이벤트 처리하는 1번째 방법 : 각각의 요소에 on이벤트명 속성에 ="이벤트가 발생할 때 호출되는 함수명();"
function p_click(){
alert("p_click")
}
// 이벤트 처리 2번째 방법
var h2elemt = document.getElementById("tne");
h2elemt.onclick = function (){ // 함수명이 없는 것 == 익명(무명) 함수
alert("h2_click")
}
</script>
<script>
// div 태그 안에 a 링크태그를 모두 얻어오고싶다.
// document.getElementsByTagName("a") // 이렇게 해도 모두 가져올 수 있음. 단점은.. div 태그 밖에 있는 a태그도 다 가져옴
// selector 선택자를 사용해서 요소(element)를 얻어오는 방법
// querySelectorAll(선택자)
var links = document.querySelectorAll("div.topnav a") // div 태그 안에 topnav 클래스 안에 a태그
// alert(links.length); // length : 변수에 담긴 태그의 갯수를 돌려줌
// javascript for 문 (nav 중 1개의 버튼을 누르면 다른 버튼은 활성화 하지 않게 하기)
for (var i = 0; i < links.length; i++) {
links[i].onclick = function (){
// 모든 a 링크태그의 active 클래스 속성 제거
for (var i = 0; i < links.length; i++) {
links[i].classList.remove("active");
} // for
// this : 클릭 이벤트를 받은 a 링크태그(자기자신)
// js에서 클래스 속성을 추가할 때는 classList
// this.classList.add("클래스명") => 클릭 이벤트를 받은 a 링크태그에 클래스 속성을 추가하겠다.
this.classList.add("active")
};
} // for
</script>
</body>
</html>
[jquery 코드 예시]
<!DOCTYPE html>
<html>
<head>
<meta charset="UTF-8">
<meta name="viewport" content="width=device-width, initial-scale=1.0">
<link rel="shortcut icon" type="image/x-icon" href="../images/SiSt.ico">
<script src="https://ajax.googleapis.com/ajax/libs/jquery/3.6.0/jquery.min.js"></script>
<title>2022. 5. 23. - 오전 9:35:44</title>
<style>
	body {
		margin: 0;
	}

	.topnav{
		background-color: #333;
		overflow: auto;
	}

	.topnav a{
		color: #f2f2f2;
		text-decoration: none;

		float: left;
		padding: 14px 16px; /* 패딩주니 내비 크기 커졌음 */
		text-align: center;
	}

	.topnav a:hover{
		background-color: #ddd;
		color: black;
	}

	.topnav a.active{
		background-color: #4caf50;
		color: white;
	}


</style>
</head>
<body>

<div class="topnav">
	<a href="#" class="active">Home</a>
	<a href="#">News</a>
	<a href="#">Contact</a>
	<a href="#">About</a>
</div>
<div>
	<h2 id="tne">Lorem ipsum dolor sit amet.</h2>
	<p onclick="p_click();">Lorem ipsum dolor sit amet.</p>
</div>

<script>
	// ex01_03의 js 코딩을 jquery로 수정
	// $("선택자") // 요소를 모두 가져옴
	// $("div.topnav a") == var links = document.querySelectorAll("div.topnav a") 동일한 코딩
	$("div.topnav a").click(function(event) {
		// alert("XXX")
		$("div.topnav a").removeClass("active"); // 모든 a태그의 클래스 속성 제거(클래스 제거)
		// $(this) : 이벤트가 발생한 대상
		$(this).addClass("active");
	});

</script>

</body>
</html>
[적용 결과]
> 메뉴를 클릭 할 때 마다 클릭한 메뉴만 색상이 바뀐다.
No.2 - 버튼을 클릭하면 10개의 버튼 생성
[javascript 코드 예시]
<!DOCTYPE html>
<html>
<head>
<meta charset="UTF-8">
<meta name="viewport" content="width=device-width, initial-scale=1.0">
<link rel="shortcut icon" type="image/x-icon" href="../images/SiSt.ico">
<script src="https://ajax.googleapis.com/ajax/libs/jquery/3.6.0/jquery.min.js"></script>
<title>2022. 5. 23. - 오전 10:24:37</title>
</head>
<body>
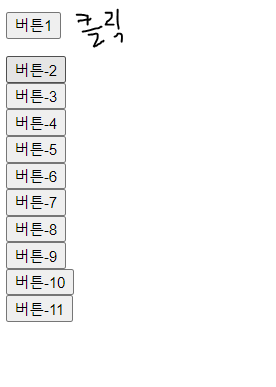
<h3>ex02.html</h3>
<button id="btn1">버튼1</button>
<p id="demo">
</p>
<script>
// 버튼1을 클릭할 때 버튼 10개 생성해서 추가
// document.getElementById("btn1");
// p태그 추가후 개행 작업 추가..
document.querySelector("#btn1").onclick = function(){
var pelemt = document.querySelector("#demo");
for (var i = 1; i <= 10; i++) {
var btn = document.createElement("button"); // 버튼 생성
var txtNode = document.createTextNode("버튼-" + (i+1));
btn.appendChild(txtNode);
pelemt.appendChild(btn);
pelemt.appendChild(document.createElement("br"));
}
};
/*
// document.querySelector("#btn1") == 선택자를 가지고 요소를 1개 가지고 오겠다.
document.querySelector("#btn1").onclick = function(){
for (var i = 1; i <= 10; i++) {
var btn = document.createElement("button"); // 버튼 생성
var txtNode = document.createTextNode("버튼-" +(i+1));
btn.appendChild(txtNode); // 버튼의 자식으로 문자열노드를 넣겠다.
document.body.appendChild(btn) // 생선된 버튼을 body 요소의 자식으로 추가하겠다.
}
};
*/
</script>
<script>
/*
// document.createElement("태그명") => 요소를 생성하겠다.
var btn = document.createElement("button"); // 버튼 생성
// btn.innerText = "버튼3"; ***
// document.createTextNode(자식노드로들어갈문자열노드)
var txtNode = document.createTextNode("버튼4");
btn.appendChild(txtNode); // 버튼의 자식으로 문자열노드를 넣겠다.
document.body.appendChild(btn) // 생선된 버튼을 body 요소의 자식으로 추가하겠다.
*/
</script>
</body>
</html>
[jquery 코드 예시]
<!DOCTYPE html>
<html>
<head>
<meta charset="UTF-8">
<meta name="viewport" content="width=device-width, initial-scale=1.0">
<link rel="shortcut icon" type="image/x-icon" href="../images/SiSt.ico">
<script src="https://ajax.googleapis.com/ajax/libs/jquery/3.6.0/jquery.min.js"></script>
<title>2022. 5. 23. - 오전 10:24:37</title>
</head>
<body>
<h3>ex02.html</h3>

<button id="btn1">버튼1</button>

<p id="demo">
</p>

<script>
	// 버튼1을 클릭할 때 버튼 10개 생성해서 추가
	$("#btn1").click(function(event){
		for (var i = 1; i <= 10; i++) {
								// 버튼 객체를 생성하는 코딩 == <button>버튼-?</button>
			// $("#demo").append($("<button>버튼-" + (i+1) + "</button>"));
			// $("#demo").append($("<br>"));

			$("#demo")
				.append($("<button>버튼-" + (i+1) + "</button>"))
				.append($("<br>"));

		} // for
	});

</script>

</body>
</html>
[적용 결과]
No.3 - 페이징 처리하기
[javascript 코드 예시]
<!DOCTYPE html>
<html>
<head>
<meta charset="UTF-8">
<meta name="viewport" content="width=device-width, initial-scale=1.0">
<link rel="shortcut icon" type="image/x-icon" href="../images/SiSt.ico">
<script src="https://ajax.googleapis.com/ajax/libs/jquery/3.6.0/jquery.min.js"></script>
<title>2022. 5. 23. - 오전 11:07:48</title>
<style>
*{
box-sizing: border-box;
}
.pagination{
overflow: auto;
width: 50%;
margin: 0 auto;
}
.pagination a{
color: black;
text-decoration: none;
float: left;
width: 8.3%;
text-align: center;
}
.pagination a:hover:not(.active){ /* :not(.active) active 클래스명을 가진것은 제외하고.. */
background-color: #ddd;
}
.pagination a.active{
background-color: dodgerblue;
color: white;
}
</style>
</head>
<body>
<h3>페이징 처리</h3>
<div class="pagination">
<!-- a[href="#"]*12>{$} -->
<a href="#">1</a>
<a href="#">2</a>
<a href="#">3</a>
<a href="#">4</a>
<a href="#">5</a>
<a href="#">6</a>
<a href="#" class="active">7</a>
<a href="#">8</a>
<a href="#">9</a>
<a href="#">10</a>
<a href="#">></a>
<a href="#">»</a>
</div>
<!-- js 코딩 -->
<script>
var links = document.querySelectorAll("div.pagination a")
for (var i = 0; i < links.length; i++) {
links[i].onclick = function (){
for (var i = 0; i < links.length; i++) {
links[i].classList.remove("active");
} // for
this.classList.add("active")
};
} // for
</script>
</body>
</html>
[jquery 코드 예시]
<!DOCTYPE html>
<html>
<head>
<meta charset="UTF-8">
<meta name="viewport" content="width=device-width, initial-scale=1.0">
<link rel="shortcut icon" type="image/x-icon" href="../images/SiSt.ico">
<script src="https://ajax.googleapis.com/ajax/libs/jquery/3.6.0/jquery.min.js"></script>
<title>2022. 5. 23. - 오전 11:07:48</title>
<style>
*{
box-sizing: border-box;
}
.pagination{
overflow: auto;
width: 50%;
margin: 0 auto;
}
.pagination a{
color: black;
text-decoration: none;
float: left;
width: 8.3%;
text-align: center;
}
.pagination a:hover:not(.active){ /* :not(.active) active 클래스명을 가진것은 제외하고.. */
background-color: #ddd;
}
.pagination a.active{
background-color: dodgerblue;
color: white;
}
</style>
</head>
<body>
<h3>페이징 처리</h3>
<div class="pagination">
<!-- a[href="#"]*12>{$} -->
<a href="#">1</a>
<a href="#">2</a>
<a href="#">3</a>
<a href="#">4</a>
<a href="#">5</a>
<a href="#">6</a>
<a href="#" class="active">7</a>
<a href="#">8</a>
<a href="#">9</a>
<a href="#">10</a>
<a href="#">></a>
<a href="#">»</a>
</div>
<!-- jq 코딩 -->
<script>
$("div.pagination a").click(function(event) {
// $("div.pagination a").removeClass("active"); //전체 태그에 active 클래스 속성 제거
// not() : jquery method
$(".pagination a").not(this).removeClass("active"); // 클릭된 자기자신은 제외하고 나머지 태그에서 active 클래스 속성 제거하겠다.
$(this).addClass("active");
});
</script>
</body>
</html>
[적용 결과]
> 클릭한 페이지의 색깔이 바뀐다.

No.4 - 버튼을 클릭하면 이미지를 보이기, 숨기기
[javascript 코드 예시]
<!DOCTYPE html>
<html>
<head>
<meta charset="UTF-8">
<meta name="viewport" content="width=device-width, initial-scale=1.0">
<link rel="shortcut icon" type="image/x-icon" href="../images/SiSt.ico">
<script
src="https://ajax.googleapis.com/ajax/libs/jquery/3.6.0/jquery.min.js"></script>
<title>2022. 5. 23. - 오후 12:11:33</title>
<style>
.imgbox {
width: 120px;
border: 1px solid gray;
padding: 6px;
text-align: center;
float: left;
}
.imgbox img, .imgbox button {
width: 100%;
}
</style>
<style>
#imgbox1 {
/* 영역과 내용물 모두 보이지 않음 */
/* display: none; */
}
#imgbox2 {
/* 영역은 그대로 유지되고 콘텐츠만 보이지 않음 -> 레이아웃(배치)할 때 영향을 미침 */
/* visibility: hidden; */
}
</style>
</head>
<body>
<h3>display:none; visibility:hidden; 차이점 (둘다 보이지않도록 숨기는 기능)</h3>
<!-- #imgbox$.imgbox*3>{Box$}+img+button -->
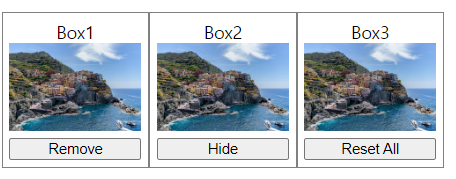
<div id="imgbox1" class="imgbox">
Box1 <img src="../images/img_5terre.jpg" alt="" />
<!-- 이벤트 처리 1번째 방법 -->
<button onclick="remove();">Remove</button>
<script>
function remove() {
// 자바스크립트로 속성 값을 줄 때 무조건 문자열이다. ""
document.getElementById("imgbox1").style.display = "none";
}
</script>
</div>
<div id="imgbox2" class="imgbox">
Box2 <img src="../images/img_5terre.jpg" alt="" />
<button id="btnHide">Hide</button>
<!-- 이벤트 처리 2번째 방법 -->
<script>
// id가 imgbox2에 있는 자식 중 button
document.querySelector("#imgbox2 button").onclick = function() {
document.getElementById("imgbox2").style.visibility = "hidden";
}
/*
document.getElementById("btnHide").onclick = function(){
document.getElementById("imgbox2").style.visibility = "hidden";
}
*/
</script>
</div>
<div id="imgbox3" class="imgbox">
Box3 <img src="../images/img_5terre.jpg" alt="" />
<button>Reset All</button>
<script>
document.querySelector("#imgbox3 button").onclick = function() {
document.getElementById("imgbox1").style.display = "block";
document.querySelector("#imgbox2").style.visibility = "visible";
}
</script>
</div>
</body>
</html>
[jquery 코드 예시]
<!DOCTYPE html>
<html>
<head>
<meta charset="UTF-8">
<meta name="viewport" content="width=device-width, initial-scale=1.0">
<link rel="shortcut icon" type="image/x-icon" href="../images/SiSt.ico">
<script src="https://ajax.googleapis.com/ajax/libs/jquery/3.6.0/jquery.min.js"></script>
<title>2022. 5. 23. - 오후 12:11:33</title>
<style>
	.imgbox{
		width: 120px;
		border: 1px solid gray;
		padding: 6px;
		text-align: center;

		float: left;
	}

	.imgbox img, .imgbox button{
		width: 100%;
	}
</style>
<style>
	#imgbox1{	}

	#imgbox2{	}

</style>
</head>
<body>
<h3>display:none;	visibility:hidden; 차이점 (둘다 보이지않도록 숨기는 기능)</h3>

<!-- #imgbox$.imgbox*3>{Box$}+img+button -->
<div id="imgbox1" class="imgbox">
	Box1
	<img src="../images/img_5terre.jpg" alt="" />
	<button onclick="remove();">Remove</button>
</div>

<div id="imgbox2" class="imgbox">
	Box2
	<img src="../images/img_5terre.jpg" alt="" />
	<button id="btnHide">Hide</button>
</div>

<div id="imgbox3" class="imgbox">
	Box3
	<img src="../images/img_5terre.jpg" alt="" />
	<button>Reset All</button>
</div>

<!-- jquery 코딩으로 수정 -->
<script>
	$("#imgbox1 button").click(function (event) {
		// jquery 메소드 중 css()
		// $("#imgbox1").css("display", "none");
		$("#imgbox1").hide();
	});

	$("#imgbox2 button").click(function (event) {
		// jquery 메소드 중 css()
		$("#imgbox2").css("visibility", "hidden");
	});

	// jquery 메소드 중 hide(), show()
	$("#imgbox3 button").click(function (event) {
		// jquery 메소드 중 css()
		// $("#imgbox1").css("display", "block");
		$("#imgbox1").show();
		$("#imgbox2").css("visibility", "visible");
	});
</script>

</body>
</html>
[적용 결과]
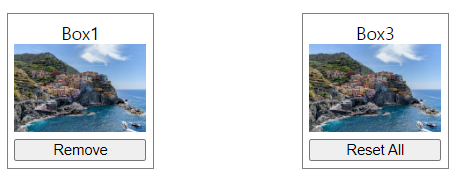
remove와 hide 둘 중에 하나의 버튼을 클릭하거나 둘 다 클릭한 후 ResetAll 버튼을 누른다면 처음과 같은 상태로 돌아온다.
remove 버튼 클릭시
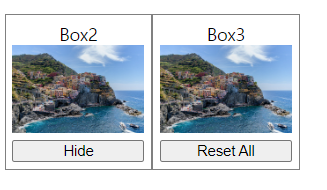
hide 버튼 클릭시
No.5 - 버튼을 클릭하면 내용을 보이기, 숨기기
[javascript 코드 예시]
<!DOCTYPE html>
<html>
<head>
<meta charset="UTF-8">
<meta name="viewport" content="width=device-width, initial-scale=1.0">
<link rel="shortcut icon" type="image/x-icon" href="../images/SiSt.ico">
<script src="https://ajax.googleapis.com/ajax/libs/jquery/3.6.0/jquery.min.js"></script>
<title>2022. 5. 23. - 오후 12:41:20</title>
<style>
	#panel, .flip{
		font-size: 16px;
		padding: 10px;
		background-color: #4acf50;
		color: white;
		text-align: center;
		margin: auto;
		border: 1px solid #a6d8a8;
	}

	#panel{
		display: none;
	}

</style>
</head>
<body>
<!-- p.flip>{Click to show panel}^#panel>p*3>lorem -->
<p class="flip">Click to show panel</p>
<div id="panel">
	<p>Lorem ipsum dolor sit amet, consectetur adipisicing elit. Eos adipisci commodi est eum consectetur voluptates maxime. Assumenda eum numquam quae voluptas ea distinctio quos provident quas magni temporibus dolore voluptate.</p>
	<p>Fugiat dolorum voluptatibus iusto voluptate aut amet veniam quam deserunt non. Laborum molestias nulla reprehenderit quidem repellendus cumque consequuntur soluta necessitatibus eaque eum ullam facilis sapiente beatae labore vitae mollitia!</p>
	<p>Molestiae aut provident sint numquam atque ipsa nisi enim officia. Necessitatibus similique minima temporibus id vitae quisquam laudantium magni minus earum nihil cum harum modi iusto unde cupiditate asperiores nemo.</p>
</div>

<!-- js 코딩 1번째 방법-->
<!-- <script>
	document.querySelector(".flip").onclick = function () {
		var panelDisplayValue = document.getElementById("panel").style.display; // panel의 display 속성 값 가져오기
		// alert(panelDisplayValue); // 처음에는 속성 값이 아무것도 안나오는 것을 확인
		if(panelDisplayValue == "" || panelDisplayValue == "none"){ // if문을 넣고 확인해보니 속성 값이 none일 때도 안보여져야함
			document.getElementById("panel").style.display = "block";
		} else {
			document.getElementById("panel").style.display = "none";
		}
	}
</script> -->


<!-- js 코딩 2번째 방법-->
<script>
	var sw = true; // 스위치 변수 선언

	document.querySelector(".flip").onclick = function () {
		var panelDisplayValue = document.getElementById("panel").style.display; // panel의 display 속성 값 가져오기
		/*
		if(sw){
			document.getElementById("panel").style.display = "block";
		} else {
			document.getElementById("panel").style.display = "none";
		} */

		// 삼항연산자 사용
		document.getElementById("panel").style.display = sw ? "block" : "none";

		sw = !sw;
	}
</script>

</body>
</html>
[jquery 코드 예시]
<!DOCTYPE html>
<html>
<head>
<meta charset="UTF-8">
<meta name="viewport" content="width=device-width, initial-scale=1.0">
<link rel="shortcut icon" type="image/x-icon" href="../images/SiSt.ico">
<script src="https://ajax.googleapis.com/ajax/libs/jquery/3.6.0/jquery.min.js"></script>
<title>2022. 5. 23. - 오후 12:41:20</title>
<style>
	#panel, .flip{
		font-size: 16px;
		padding: 10px;
		background-color: #4acf50;
		color: white;
		text-align: center;
		margin: auto;
		border: 1px solid #a6d8a8;
	}

	#panel{
		display: none;
	}

</style>
</head>
<body>
<!-- p.flip>{Click to show panel}^#panel>p*3>lorem -->
<p class="flip">Click to show panel</p>
<div id="panel">
	<p>Lorem ipsum dolor sit amet, consectetur adipisicing elit. Eos adipisci commodi est eum consectetur voluptates maxime. Assumenda eum numquam quae voluptas ea distinctio quos provident quas magni temporibus dolore voluptate.</p>
	<p>Fugiat dolorum voluptatibus iusto voluptate aut amet veniam quam deserunt non. Laborum molestias nulla reprehenderit quidem repellendus cumque consequuntur soluta necessitatibus eaque eum ullam facilis sapiente beatae labore vitae mollitia!</p>
	<p>Molestiae aut provident sint numquam atque ipsa nisi enim officia. Necessitatibus similique minima temporibus id vitae quisquam laudantium magni minus earum nihil cum harum modi iusto unde cupiditate asperiores nemo.</p>
</div>

<!-- jq 코딩 1번째 방법-->
<!-- <script>
	$("p.flip").click(function (event) {
		// console.log($("#panel").css("display")) // 속성 값을 가져오는 코딩
		if ($("#panel").css("display") == "none") { // 속성 값에 따라서..
			// $("#panel").css("display", "block");
			$("#panel").show();
		} else {
			// $("#panel").css("display", "none");
			$("#panel").hide();
		}
	});
</script> -->

<!-- jq 코딩 2번째 방법 -->
<script>
	$(".flip").click(function (event) {
		// $("#panel").toggle();
		$("#panel").slideToggle(); // 스르륵 내려옴
	});
</script>

</body>
</html>
[적용 결과]
클릭전
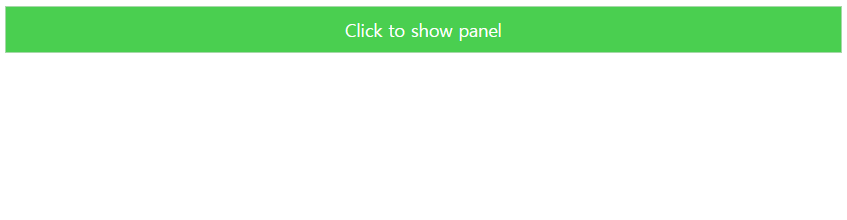
클릭후

No.6 - 풍선 도움말 만들기
[javascript 코드 예시]
<!DOCTYPE html>
<html>
<head>
<meta charset="UTF-8">
<meta name="viewport" content="width=device-width, initial-scale=1.0">
<link rel="shortcut icon" type="image/x-icon" href="../images/SiSt.ico">
<script src="https://ajax.googleapis.com/ajax/libs/jquery/3.6.0/jquery.min.js"></script>
<title>2022. 5. 24. - 오후 2:49:23</title>
<style>
div > p{
background-color: yellow;
padding: 20px;
display: none;
}
</style>
</head>
<body>
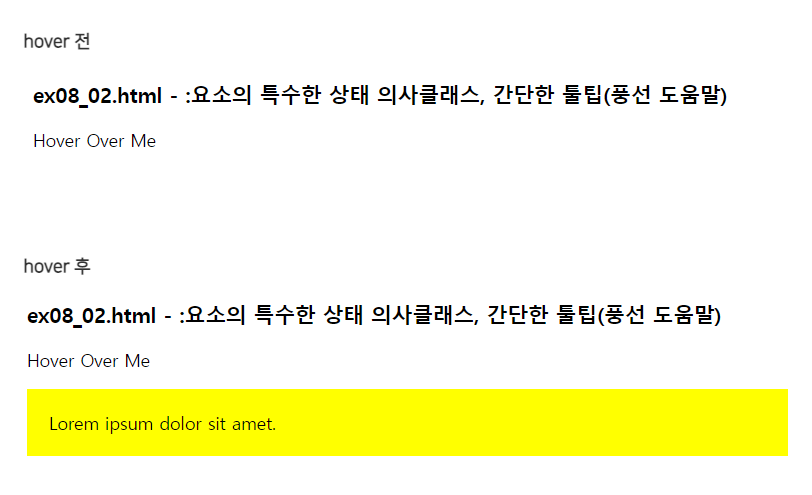
<h3>ex08_03.html - js와 jq로 툴팁 기능(풍선 도움말) 구현</h3>
<!-- <div onmouseover="div_mouseover();" onmouseout="div_mouseout();"> --><!-- js 코딩시 사용 -->
<div>
Hover Over Me
<p>Lorem ipsum dolor sit amet.</p>
<p>Harum illo obcaecati accusamus dolores?</p>
<p>Quis a sed laborum corporis!</p>
</div>
<!-- js 코딩 -->
<script>
function div_mouseover() {
// console.log("onmouseover");
document.querySelector("div > p:first-child").style.display = "block";
}
function div_mouseout() {
// console.log("onmouseout");
document.querySelector("div > p:first-child").style.display = "none";
}
</script>
</body>
</html>
[jquery 코드 예시]
<!-- jq 코딩 -->
<script>
	/*
	$("div").mouseover(function (event) {
		$("div > p:first-child").show();
	});

	$("div").mouseout(function (event) {
		$("div > p:first-child").hide();
	});
	*/


/* 	$("div")
		.mouseover(function (event) {
			// $("div > p:first-child").show();
			// 자기 자신 안에 있는 첫 번째 자식 p 태그
			$("p:first-child", this).show();
		})
		.mouseout(function (event) {
			$("div > p:first-child").hide();
		}); */

	$("div").hover(
		function (event) { // mouseover
			$("p:first-child", this).show();
		}, function (event) { // mouseout
			$("div > p:first-child").hide();
		}
	);


</script>
[적용 결과]
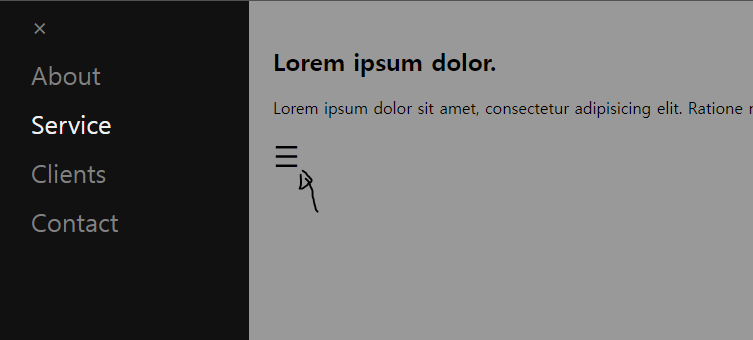
No.7 - 탐색모음 : nav 수직 메뉴바
<javascript + jquery 코드 예시>
<!DOCTYPE html>
<html>
<head>
<meta charset="UTF-8">
<meta name="viewport" content="width=device-width, initial-scale=1.0">
<link rel="shortcut icon" type="image/x-icon" href="../images/SiSt.ico">
<script src="https://ajax.googleapis.com/ajax/libs/jquery/3.6.0/jquery.min.js"></script>
<title>2022. 5. 25. - 오전 10:09:42</title>
<style>
body{
transition: 0.5s ease;
}
div#main{
padding: 16px;
transition: 0.5s ease;
}
.sidenav{
background-color: #111;
position: fixed;
left: 0;
top: 0;
height: 100%;
width: 0; /* 250px -> 0으로 변경하여 메뉴바가 안보임 */
overflow-x: hidden; /* x축에 오버플로워 발생하면.. */
transition: 0.5s ease;
}
.sidenav a{
display: block;
text-decoration: none;
font-size: 25px;
padding: 8px 8px 8px 32px;
color: #818181;
transition: 0.3s ease;
}
.sidenav a:hover{
color: #f1f1f1;
}
</style>
</head>
<body>
<!-- <h3>탐색모음 : nav 메뉴바(수평, [수직])</h3> -->
<!-- #mySidenav.sidenav>a[href='#']*5 -->
<div id="mySidenav" class="sidenav">
<a href="#" class="closebtn">×</a> <!-- x인 닫기 모양 -->
<a href="#">About</a>
<a href="#">Service</a>
<a href="#">Clients</a>
<a href="#">Contact</a>
</div>
<!-- #main>h2>lorem3^p>lorem20^span -->
<div id="main">
<h2>Lorem ipsum dolor.</h2>
<p>Lorem ipsum dolor sit amet, consectetur adipisicing elit. Ratione nemo magnam voluptates totam numquam voluptas consectetur aliquam fuga itaque accusamus?</p>
<span style="cursor:pointer; font-size:30px;" onclick="openNav();">☰</span>
</div>
<script>
function openNav() {
document.getElementById("mySidenav").style.width="250px";
document.getElementById("main").style.marginLeft="250px"; // margin-left에서 -를 빼고 l을 대문자로!
document.body.style.backgroundColor="rgba(0,0,0,0.4)";
}
$("#mySidenav .closebtn").click(function () {
$("#mySidenav").css("width", "0");
$("#main").css("margin-left", "0");
// $(this).parents("div").css("width", "0");
// body의 배경색을 흰색으로 설정
$("body").css("background-color", "white");
});
</script>
</body>
</html>
<적용 결과>
No.8-1 - 버튼 클릭 시 회전, 버튼 클릭 시 회전 멈춤(javascript 코딩만)
[코드 예시]
<!DOCTYPE html>
<html>
<head>
<meta charset="UTF-8">
<meta name="viewport" content="width=device-width, initial-scale=1.0">
<link rel="shortcut icon" type="image/x-icon" href="../images/SiSt.ico">
<script src="https://ajax.googleapis.com/ajax/libs/jquery/3.6.0/jquery.min.js"></script>
<title>2022. 5. 26. - 오후 2:03:22</title>
<style>
	div{
		width: 300px;
		height: 50px;
		background-color: yellow;
		border: 1px solid black;
	}
</style>
</head>
<body>

<br>
<button>회전 시작</button><button>회전 멈춤</button>

<div>Lorem ipsum dolor sit amet, consectetur adipisicing elit. Atque eius!</div>

<script>
	var timer;
	var angle = 10;

	document.querySelector("button:first-of-type").onclick = function name() {
		// 일정한 시간 간격으로 반복적 실행
		// setTimeout();
		timer = setInterval(div_rotate, 10);
		// this.style.display = "none"; // 회전시작 누르면 회전시작 버튼 안보이게 하는 것
		this.disabled = "true"; // 회전시작 버튼을 누르면 회전시작 다시 사용 못하게 하는 것
	}

	function div_rotate() {
		var target = document.querySelector("div");
		target.style.transform = "rotate("+ angle + "deg)";
		angle += 1;
	}

	document.querySelector("button:nth-of-type(2)").onclick = function name() {
		clearInterval(timer);
	}
</script>
</body>
</html>
No.8-2 - 버튼 클릭 시 회전 각도 증가
[코드 예시]
<!DOCTYPE html>
<html>
<head>
<meta charset="UTF-8">
<meta name="viewport" content="width=device-width, initial-scale=1.0">
<link rel="shortcut icon" type="image/x-icon" href="../images/SiSt.ico">
<script src="https://ajax.googleapis.com/ajax/libs/jquery/3.6.0/jquery.min.js"></script>
<title>2022. 5. 26. - 오후 3:27:16</title>
<style>
	div{
		width: 300px;
		height: 100px;
		background-color: yellow;
		border: 1px solid black;
	}
</style>
</head>
<body>
<button>회전 시작</button>
<div>Lorem ipsum dolor sit amet.</div>
<div id="demo">Lorem ipsum dolor sit amet.</div>
<script>
	var timer;
	var angle = 10;

	document.querySelector("button:first-of-type").onclick = function name() {
		timer = setInterval(div_rotate, 10);
	}

	function div_rotate() {
		var target = document.querySelector("#demo");
		//target.style.transform = "rotateX("+ angle + "deg)";
		//target.style.transform = "rotateY("+ angle + "deg)";
		//target.style.transform = "rotateZ("+ angle + "deg)";
		target.style.transform = "rotate3d(" + angle + "," + angle + "," + angle + "," + angle + "deg)";
		angle += 1;
	}

/* 	버튼 하나 더 생성한 뒤에 사용할 수 있는 회전 멈추는 자바스크립트 코딩
	document.querySelector("button:nth-of-type(2)").onclick = function name() {
		clearInterval(timer);
	} */
</script>
</body>
</html>
[코드 예시]
<!DOCTYPE html>
<html>
<head>
<meta charset="UTF-8">
<meta name="viewport" content="width=device-width, initial-scale=1.0">
<link rel="shortcut icon" type="image/x-icon" href="../images/SiSt.ico">
<script src="https://ajax.googleapis.com/ajax/libs/jquery/3.6.0/jquery.min.js"></script>
<title>2022. 5. 26. - 오후 3:43:16</title>
<style>
#rotate2D, #rotate3D {
    width: 80px;
    height: 70px;
    color: white;
          position:relative;
    font-weight:bold;
    font-size:15px;
    padding:10px;
    float:left;
    margin-right:50px;
    border-radius:5px;
    border:1px solid #000000;
    background:red;
    margin:10px;
}
</style>

</head>
<body>
<div style="height: 80px;">
<div id="rotate2D" onmouseover="rotateDIV();">2D rotate</div>
<div id="rotate3D" onmouseover="rotateYDIV();">3D rotate</div>
</div>

<script>

  var x,y,n=0,ny=0,rotINT,rotYINT;

function rotateDIV()
{
   x=document.getElementById("rotate2D");
   clearInterval(rotINT);
   rotINT=setInterval("startRotate()",10);
}
function rotateYDIV()
{
   y=document.getElementById("rotate3D");
   clearInterval(rotYINT);
   rotYINT=setInterval("startYRotate()",10);
}
function startRotate()
{
   n=n+1;
   //        transform:rotateX(150deg);
   x.style.transform="rotate(" + n + "deg)";
   x.style.webkitTransform="rotate(" + n + "deg)";
   x.style.OTransform="rotate(" + n + "deg)";
   x.style.MozTransform="rotate(" + n + "deg)";
   if (n==180 || n==360)
   {
      clearInterval(rotINT);
   if (n==360){n=0}
   }
}
function startYRotate()
{
   ny=ny+1
   y.style.transform="rotateY(" + ny + "deg)"
   y.style.webkitTransform="rotateY(" + ny + "deg)"
   y.style.OTransform="rotateY(" + ny + "deg)"
   y.style.MozTransform="rotateY(" + ny + "deg)"
   if (ny==180 || ny>=360)
   {
      clearInterval(rotYINT)
      if (ny>=360){ny=0}
   }
}

</script>
</body>
</html>'TIL > Web(HTML, CSS, JS, jQuery)' 카테고리의 다른 글
| [SIST] Web_jquery_days01(맛보기) (0) | 2022.05.29 |
|---|---|
| [SIST] Web_javascript_days01_클래스 속성 추가, 스타일 / 속성 추가 및 변경, 문자 추가 및 변경, 라디오버튼 / 체크박스 체크 값 가져오기 (0) | 2022.05.28 |
| [SIST] Web_CSS_days06_CSS 애니메이션 효과 (0) | 2022.05.26 |
| [SIST] Web_CSS_days06_CSS 전환 작업(transition 속성) (0) | 2022.05.26 |
| [SIST] Web_CSS_days06_CSS로 2D, 3D 변환 작업(transform 속성) (0) | 2022.05.26 |