
이전에 작성한 thymeleaf 문법 - 기본 기능 (1) 글과 이어지는 내용입니다!
https://yelin1217.tistory.com/457
[TIL/View Template] thymeleaf 문법 - 기본 기능 (1)
[타임리프 기본 기능의 종류]- 링크 : https://www.thymeleaf.org/doc/tutorials/3.0/usingthymeleaf.html#standard-expression-syntax• 간단한 표현: ◦ 변수 표현식: ${...} ◦ 선택 변수 표현식: *{...} ◦ 메시지 표현식: #{...
yelin1217.tistory.com
1. 유틸리티 객체와 날짜
타임리프는 문자, 숫자, 날짜, URI등을 편리하게 다루는 다양한 유틸리티 객체들을 제공한다.
#message : 메시지, 국제화 처리
#uris : URI 이스케이프 지원
#dates : java.util.Date 서식 지원
#calendars : java.util.Calendar 서식 지원
#temporals : 자바8 날짜 서식 지원
#numbers : 숫자 서식 지원
#strings : 문자 관련 편의 기능
#objects : 객체 관련 기능 제공
#bools : boolean 관련 기능 제공
#arrays : 배열 관련 기능 제공
#lists , #sets , #maps : 컬렉션 관련 기능 제공
* 스프링 부트 3.2 이상 사용하면, 타임리프 자바8 날짜 지원 라이브러리가 이미 포함되어 있어 별도로 포함하지 않아도 된다.
아래 예시를 통해서 어떻게 사용하는지 살펴보자
컨트롤러는 기본 기능(1)에 사용했던 BasicController에 API를 추가하는 형태로 진행했다.
Controller
@GetMapping("/date")
public String date(Model model) {
 model.addAttribute("localDateTime", LocalDateTime.now());
 return "basic/date";
}
date.html
<!DOCTYPE html>
<html xmlns:th="http://www.thymeleaf.org">
<head>
  <meta charset="UTF-8">
  <title>Title</title>
</head>
<body>

<h1>LocalDateTime</h1>
<ul>
  <li>default = <span th:text="${localDateTime}"></span></li>
  <li>yyyy-MM-dd HH:mm:ss = <span th:text="${#temporals.format(localDateTime, 'yyyy-MM-dd HH:mm:ss')}"></span></li>
</ul>

<h1>LocalDateTime - Utils</h1>
<a href="https://www.thymeleaf.org/doc/tutorials/3.0/usingthymeleaf.html#appendix-b-expression-utility-objects">타임리프 날짜 객체 예시 링크</a>
<ul>
  <li>${#temporals.day(localDateTime)} = <span th:text="${#temporals.day(localDateTime)}"></span></li>
  <li>${#temporals.month(localDateTime)} = <span th:text="${#temporals.month(localDateTime)}"></span></li>
  <li>${#temporals.monthName(localDateTime)} = <span th:text="${#temporals.monthName(localDateTime)}"></span></li>
  <li>${#temporals.monthNameShort(localDateTime)} = <span th:text="${#temporals.monthNameShort(localDateTime)}"></span></li>
  <li>${#temporals.year(localDateTime)} = <span th:text="${#temporals.year(localDateTime)}"></span></li>
  <li>${#temporals.dayOfWeek(localDateTime)} = <span th:text="${#temporals.dayOfWeek(localDateTime)}"></span></li>
  <li>${#temporals.dayOfWeekName(localDateTime)} = <span th:text="${#temporals.dayOfWeekName(localDateTime)}"></span></li>
  <li>${#temporals.dayOfWeekNameShort(localDateTime)} = <span th:text="${#temporals.dayOfWeekNameShort(localDateTime)}"></span></li>
  <li>${#temporals.hour(localDateTime)} = <span th:text="${#temporals.hour(localDateTime)}"></span></li>
  <li>${#temporals.minute(localDateTime)} = <span th:text="${#temporals.minute(localDateTime)}"></span></li>
  <li>${#temporals.second(localDateTime)} = <span th:text="${#temporals.second(localDateTime)}"></span></li>
  <li>${#temporals.nanosecond(localDateTime)} = <span th:text="${#temporals.nanosecond(localDateTime)}"></span></li>
</ul>

</body>
</html>
결과물은 아래와 같이 나오게된다.

2. URL 링크 : URL 생성
타임리프에서 URL을 생성할 때는 @{...} 문법을 사용하면 된다.
controller
@GetMapping("/link")
public String link(Model model) {
    model.addAttribute("param1", "data1");
    model.addAttribute("param2", "data2");
    return "basic/link";
}
link.html
<!DOCTYPE html>
<html xmlns:th="http://www.thymeleaf.org">
<head>
<meta charset="UTF-8">
<title>Title</title>
</head>
<body>
<h1>URL 링크</h1>
<ul>
<li><a th:href="@{/hello}">basic url</a></li><!-- http://localhost:8081/hello -->
<li><a th:href="@{/hello(param1=${param1}, param2=${param2})}">hello query param</a></li><!-- http://localhost:8081/hello?param1=data1¶m2=data2 -->
<li><a th:href="@{/hello/{param1}/{param2}(param1=${param1}, param2=${param2})}">path variable</a></li> <!-- http://localhost:8081/hello/data1/data2 -->
<li><a th:href="@{/hello/{param1}(param1=${param1}, param2=${param2})}">pathvariable + query parameter</a></li><!-- http://localhost:8081/hello/data1?param2=data2 -->
</ul>
</body>
</html>
단순한 URL은 @{/hello} -> /hello
query parameter(쿼리 파리미터)는 ()에 있는 부분이 쿼리 파라미터로 처리된다.
@{/hello(param1=${param1}, param2=${param2})} -> /hello?param1=data1¶m2=data2
path variable(경로 변수)는 URL 경로상에 변수가 있으면 () 부분은 경로 변수로 처리된다.
@{/hello/{param1}/{param2}(param1=${param1}, param2=${param2})} -> /hello/data1/data2
경로 변수와 쿼리 파라미터를 함께 사용할 수 있다.
@{/hello/{param1}(param1=${param1}, param2=${param2})} -> /hello/data1?param2=data2
3. Literals(리터럴)
리터럴은 소스 코드상에 고정된 값을 말하는 용어이다.
String str = "Hello"
int age = 10 * 20
여기서 "Hello"는 문자 리터럴, 10과 20은 숫자 리터럴이다.
타임리프는 다음과 같은 리터럴이 있다.
문자: 'hello'
숫자 : 10
불린 : true, false
null: null
타임리프에서 문자 리터럴은 항상 '(작은 따옴표)로 감싸야 한다.
<span th:text="'hello'">
만약, 공백없이 쭉 이어진다면 하나의 의미있는 토큰으로 인지해서 다음과 같이 작은 따옴표를 생략할 수 있다.
<span th:text="hello">
공백이 포함되어 있는데 아래와 같이 사용하면 오류가 발생한다. '(작은 따옴표)로 감싸면 정상적으로 동작한다.
<span th:text="hello world!"></span>
<span th:text="'hello world!'"></span>
리터럴 대체 문법(|...|)도 있는데 해당 문법을 사용하면 템플릿을 사용하는 것처럼 편리하다.
<span th:text="|hello ${data}|">
controller
@GetMapping("/literal")
public String literal(Model model) {
 model.addAttribute("data", "Spring!");
 return "basic/literal";
}
literal.html
<html xmlns:th="http://www.thymeleaf.org">
<head>
<meta charset="UTF-8">
<title>Title</title>
</head>
<body>
<h1>리터럴</h1>
<ul>
<!--주의! 다음 주석을 풀면 예외가 발생함-->
<!-- <li>"hello world!" = <span th:text="hello world!"></span></li>-->
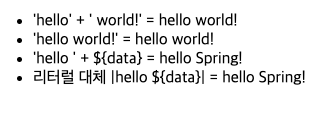
<li>'hello' + ' world!' = <span th:text="'hello' + ' world!'"></span></li>
<li>'hello world!' = <span th:text="'hello world!'"></span></li>
<li>'hello ' + ${data} = <span th:text="'hello ' + ${data}"></span></li>
<li>리터럴 대체 |hello ${data}| = <span th:text="|hello ${data}|"></span></li>
</ul>
</body>
</html>
결과는 아래와 같이 나온다.
4. 연산
1) 비교연산: HTML 엔티티를 사용해야 하는 부분을 주의하자
 > (gt)
< (lt)
>= (ge)
<= (le)
! (not)
== (eq)
!= (neq, ne)
2) 조건식: 자바의 조건식과 유사
3) Elvis 연산자(?:) : 조건식의 편의 버전
4) No-Operation(_) : _인 경우 마치 타임리프가 실행되지 않는 것처럼 동작한다. 이것을 잘 사용하면 HTML의 내용 그대로 활용할 수 있다.
Controller
@GetMapping("/operation")
public String operation(Model model) {
 model.addAttribute("nullData", null);
 model.addAttribute("data", "Spring!");
 return "basic/operation";
}
operation.html
<!DOCTYPE html>
<html xmlns:th="http://www.thymeleaf.org">
<head>
<meta charset="UTF-8">
<title>Title</title>
</head>
<body>
<ul>
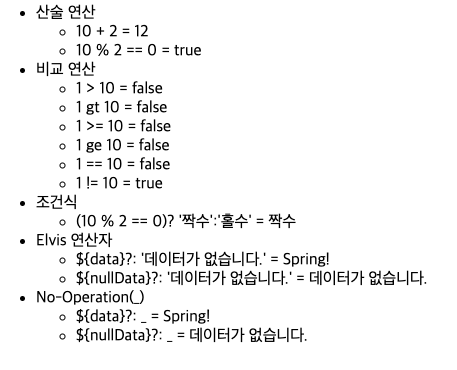
<li>산술 연산
<ul>
<li>10 + 2 = <span th:text="10 + 2"></span></li>
<li>10 % 2 == 0 = <span th:text="10 % 2 == 0"></span></li>
</ul>
</li>
<li>비교 연산
<ul>
<li>1 > 10 = <span th:text="1 > 10"></span></li>
<li>1 gt 10 = <span th:text="1 gt 10"></span></li>
<li>1 >= 10 = <span th:text="1 >= 10"></span></li>
<li>1 ge 10 = <span th:text="1 ge 10"></span></li>
<li>1 == 10 = <span th:text="1 == 10"></span></li>
<li>1 != 10 = <span th:text="1 != 10"></span></li>
</ul>
</li>
<li>조건식
<ul>
<li>(10 % 2 == 0)? '짝수':'홀수' = <span th:text="(10 % 2 == 0)? '짝수':'홀수'"></span></li>
</ul>
</li>
<li>Elvis 연산자
<ul>
<li>${data}?: '데이터가 없습니다.' = <span th:text="${data}?: '데이터가 없습니다.'"></span></li>
<li>${nullData}?: '데이터가 없습니다.' = <span th:text="${nullData}?: '데이터가 없습니다.'"></span></li>
</ul>
</li>
<li>No-Operation(_)
<ul>
<li>${data}?: _ = <span th:text="${data}?: _">데이터가 없습니다.</span></li>
<li>${nullData}?: _ = <span th:text="${nullData}?: _">데이터가 없습니다.</span></li><!-- _ 이걸 사용하면, 타임리프 태그를 무효화하고, 태그 안에 있는 기본값이 출력되어짐-->
</ul>
</li>
</ul>
</body>
</html>
결과는 아래와 같이 나온다.
5. 속성 값 설정
타임리프는 주로 HTML 태그에 th:* 속성을 지정하는 방식으로 동작한다.
th:*로 속성을 적용하면 기존 속성을 대체한다. 기존 속성이 없으면 새로 만든다.
<input type="text" name="mock" th:name="userA" />
-> 타임리프 렌더링 후 <input type="text" name="userA"
속성 추가
th:attrappend: 속성 값의 뒤에 값을 추가한다.
th:attrprepend: 속성 값의 앞에 값을 추가한다.
th:classappend: class 속성에 자연스럽게 추가한다.
checked 처리
HTML에서는 checked=false라고 지정해도 checked 속성이 있기 때문에 checked 처리가 되어버린다.
타임리프의 th:checked는 값이 false인 경우 checked 속성 자체를 제거한다.
Controller
@GetMapping("/attribute")
public String attribute() {
 return "basic/attribute";
}
attribute.html
<!DOCTYPE html>
<html xmlns:th="http://www.thymeleaf.org">
<head>
<meta charset="UTF-8">
<title>Title</title>
</head>
<body>
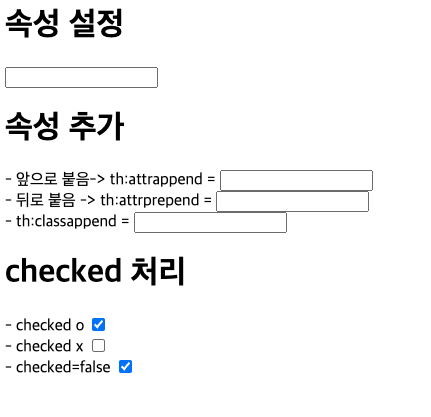
<h1>속성 설정</h1>
<!-- HTML 태그 name을 th:name으로 대체해버린다. 없으면 새로만든다.-->
<input type="text" name="mock" th:name="userA" />
<h1>속성 추가</h1>
- 앞으로 붙음-> th:attrappend = <input type="text" class="text" th:attrappend="class='large'" /><br/>
- 뒤로 붙음 -> th:attrprepend = <input type="text" class="text" th:attrprepend="class='large'" /><br/>
- th:classappend = <input type="text" class="text" th:classappend="large" /><br/>
<h1>checked 처리</h1>
- checked o <input type="checkbox" name="active" th:checked="true" /><br/>
- checked x <input type="checkbox" name="active" th:checked="false" /><br/>
- checked=false <input type="checkbox" name="active" checked="false" /><br/>
</body>
</html>
결과는 아래와 같다.
출처 : 인프런 김영한 스프링 MVC2편
'TIL > View Template' 카테고리의 다른 글
| [TIL/View Template] thymeleaf - 기본 기능(4) (0) | 2024.06.11 |
|---|---|
| [TIL/View Template] thymeleaf - 기본 기능(3) (0) | 2024.06.09 |
| [TIL/View Template] thymeleaf 문법 - 기본 기능 (1) (0) | 2024.06.03 |
| [TIL/View Template] thymeleaf 극소수의 기능 (0) | 2024.06.02 |
| [SIST] JSP_days14_JSON과 XML/JSON으로 ajax 처리 (0) | 2022.07.03 |