[SIST] Spring_days09_SpringTiles 프로젝트를 옮겨서 STS툴로 STSMVC03 만들기 + root-context와 servlet-context로 사용
어제 했던 작업을 복습차원으로 SpringTiles 프로젝트를 STS 툴을 이용하여 STSMVC03 프로젝트 생성하였다.
어제와 다른 점은 아래부터 설명하도록 하겠다.
먼저, dispatcher-service.xml에 있는 설정을 root-context.xml에 잘라서 붙여넣고
dispatcher-servlet.xml에 있는 설정을 잘라서 servlet-context.xml 잘라서 붙여 넣었다.
변경된 root-context.xml과 servlet-context.xml의 최종본은 아래와 같다.
[root-context.xml]
<?xml version="1.0" encoding="UTF-8"?>
<beans xmlns="http://www.springframework.org/schema/beans"
	xmlns:xsi="http://www.w3.org/2001/XMLSchema-instance"
	xsi:schemaLocation="http://www.springframework.org/schema/beans https://www.springframework.org/schema/beans/spring-beans.xsd">

	<!-- Root Context: defines shared resources visible to all other web components -->
	<!-- p482 - 스프링에서 DB연동할 때 사용하는 dataSource 객체 사용 / 개발 목적의 테스트 용도 -->
	<bean id="dataSource"
		class="org.springframework.jdbc.datasource.DriverManagerDataSource">
		<property name="driverClassName"
			value="oracle.jdbc.driver.OracleDriver"></property>
		<property name="url"
			value="jdbc:oracle:thin:@localhost:1521:xe"></property>
		<property name="username" value="scott"></property>
		<property name="password" value="tiger"></property>
	</bean>

	<!-- p496 NamedParameterJdbcTemplate 사용 -->
	<bean id="jdbcTemplate"
		class="org.springframework.jdbc.core.namedparam.NamedParameterJdbcTemplate">
		<!-- NamedParameterJdbcTemplate 클래스 안에 setDataSource () 메서드가 없어서 아래 프로퍼티
			사용할 수 없음 -->
		<!-- <property name="dataSource" ref="dataSource"></property> -->
		<!-- 생성자로 의존 주입 -->
		<constructor-arg ref="dataSource"></constructor-arg>
	</bean>

	<!-- p507 스프링 트랜잭션을 처리할 트랜잭션 매니저 등록 -->
	<bean id="transactionManager"
		class="org.springframework.jdbc.datasource.DataSourceTransactionManager">
		<property name="dataSource" ref="dataSource"></property>
	</bean>

	<!-- 트랜잭션을 처리하는 템플릿 등록 -->
	<bean id="transactionTemplate"
		class="org.springframework.transaction.support.TransactionTemplate">
		<property name="transactionManager" ref="transactionManager"></property>
	</bean>
</beans>
[servlet-context.xml]
<?xml version="1.0" encoding="UTF-8"?>
<beans xmlns:mvc="http://www.springframework.org/schema/mvc"
	xmlns:xsi="http://www.w3.org/2001/XMLSchema-instance"
	xmlns="http://www.springframework.org/schema/beans"
	xmlns:context="http://www.springframework.org/schema/context"
	xmlns:tx="http://www.springframework.org/schema/tx"
	xmlns:aop="http://www.springframework.org/schema/aop"
	xsi:schemaLocation="http://www.springframework.org/schema/mvc https://www.springframework.org/schema/mvc/spring-mvc.xsd
		http://www.springframework.org/schema/beans https://www.springframework.org/schema/beans/spring-beans.xsd
		http://www.springframework.org/schema/context https://www.springframework.org/schema/context/spring-context.xsd
		http://www.springframework.org/schema/aop http://www.springframework.org/schema/aop/spring-aop-3.1.xsd
		http://www.springframework.org/schema/tx http://www.springframework.org/schema/tx/spring-tx-3.1.xsd">

	<!-- DispatcherServlet Context: defines this servlet's request-processing
		infrastructure -->

	<!-- Enables the Spring MVC @Controller programming model -->
	<mvc:annotation-driven />

	<!-- Handles HTTP GET requests for /resources/** by efficiently serving
		up static resources in the ${webappRoot}/resources directory -->
	<mvc:resources mapping="/resources/**" location="/resources/" />

	<!-- dispatcher-servlet.xml -->

	<context:component-scan base-package="org.doit.web"></context:component-scan>

	<!-- 이름이 반드시 multipartResolver 이어야함 -->
	<bean id="multipartResolver"
		class="org.springframework.web.multipart.commons.CommonsMultipartResolver">
		<!-- p439 표9.2 CommonsMultipartResolver 클래스의 프로퍼티 -->
		<property name="maxUploadSize" value="-1"></property>
	</bean>

	<!-- @Transactional 애노테이션 사용한 트랜잭션 처리 -->
	<tx:annotation-driven
		transaction-manager="transactionManager" mode="proxy"
		proxy-target-class="false" />

	<!-- 스프링 타일즈 사용하기 위해 필요한 빈 객체 -->
	<bean id="tilesConfigurer"
		class="org.springframework.web.servlet.view.tiles2.TilesConfigurer">
		<property name="definitions" value="/WEB-INF/tiles-defs.xml"></property>
	</bean>

	<bean class="org.springframework.web.servlet.view.UrlBasedViewResolver">
		<property name="viewClass"	value="org.springframework.web.servlet.view.tiles2.TilesView"></property>
	</bean>

	<!-- ViewResolver 등록 -->
	<bean class="org.springframework.web.servlet.view.InternalResourceViewResolver"></bean>

</beans>
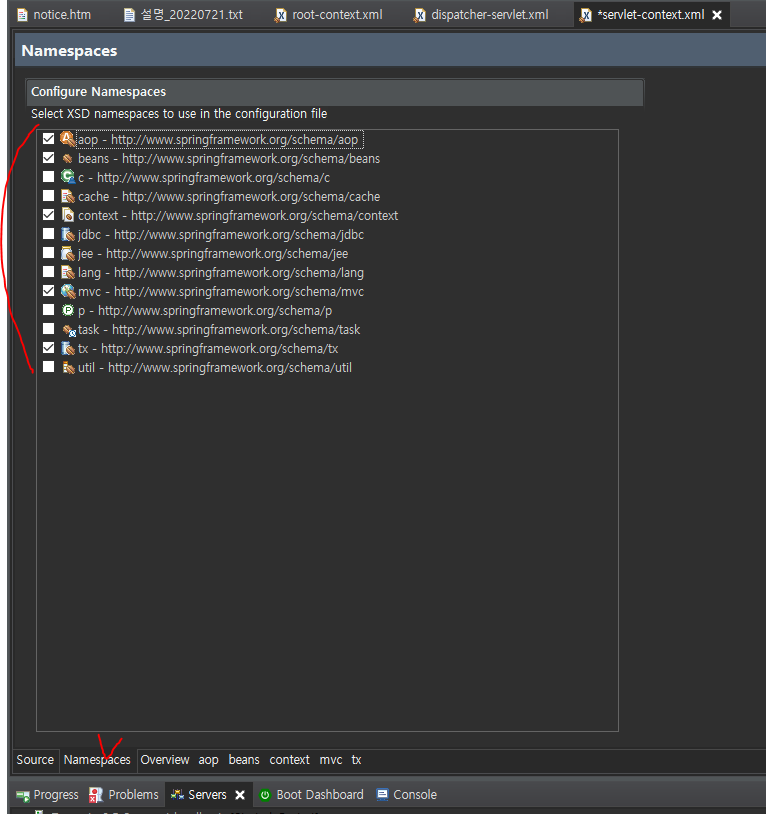
위의 최종본을 만들기 위해서 기존의 xml 파일에 있는 것을 잘라내서 붙여넣기를 하고보니 빨갛게 에러가 보인다.
beans 태그에 tx와 aop 설정하는 코드가 없기 때문이다.
하단의 Namespaces를 누르면 아래와 같은 화면이 보이는데 여기서 aop와 tx를 체크하고 다시 Source 탭을 선택하면 자동으로 aop와 tx 관련된 설정 코드가 들어가있는 것을 확인할 수 있다.
그래도 빨갛게 에러가 보인다.
확인을 해보니 servlet-context.xml 파일의 beans 태그 설정 부분에 <beans:beans>로 되어있고
xmlns:beans="http://www.springframework.org/schema/beans" 이 부분에도 :beans가 붙어 있어서 beans와 property 앞에 beans: 접두사를 붙여주어야 한다.
servlet-context는 bean 태그를 많이 사용할테니 <beans:beans> 태그에 beans: 제거하고 xmlns뒤에 :mvc를 붙인다음 xmlns:beans="http://www.springframework.org/schema/beans" 이 부분에도 beans: 제거하자 그리고 bean 태그가 아닌 태그 앞에 mvc:를 붙여주자!
해당 과정은 아래 그림과 같이 다시 설명하겠다.
[기존 dispatcher-servlet.xml]

[servlet-context.xml]

이 과정이 더 번거롭기 때문에 beans: 지우고 xmlns 다음에 :mvc를 붙이고 xmlns의 :beans를 지움

아래 부분만 mvc:를 붙이면 빨간 x가 없어진다.

SpringTiles에 있는 web.xml에서 필터 추가하는 설정을 가져와서 붙여넣고
serlvet의 url-pattern은 *.htm으로 수정해주었다.


[web.xml 전체]
<?xml version="1.0" encoding="UTF-8"?>
<web-app version="2.5" xmlns="http://java.sun.com/xml/ns/javaee"
	xmlns:xsi="http://www.w3.org/2001/XMLSchema-instance"
	xsi:schemaLocation="http://java.sun.com/xml/ns/javaee https://java.sun.com/xml/ns/javaee/web-app_2_5.xsd">

	<!-- The definition of the Root Spring Container shared by all Servlets and Filters -->
	<context-param>
		<param-name>contextConfigLocation</param-name>
		<param-value>/WEB-INF/spring/root-context.xml</param-value>
	</context-param>

	<!-- Creates the Spring Container shared by all Servlets and Filters -->
	<listener>
		<listener-class>org.springframework.web.context.ContextLoaderListener</listener-class>
	</listener>

	<!-- Processes application requests -->
	<servlet>
		<servlet-name>appServlet</servlet-name>
		<servlet-class>org.springframework.web.servlet.DispatcherServlet</servlet-class>
		<init-param>
			<param-name>contextConfigLocation</param-name>
			<param-value>/WEB-INF/spring/appServlet/servlet-context.xml</param-value>
		</init-param>
		<load-on-startup>1</load-on-startup>
	</servlet>

	<servlet-mapping>
		<servlet-name>appServlet</servlet-name>
		<url-pattern>*.htm</url-pattern>
	</servlet-mapping>

	<!-- 필터 추가 -->
	<filter>
      <filter-name>characterEncodingFilter</filter-name>
      <!-- 스프링에서 제공하는 클래스 -->
      <filter-class>org.springframework.web.filter.CharacterEncodingFilter</filter-class>
      <init-param>
         <param-name>encoding</param-name>
         <param-value>UTF-8</param-value>
      </init-param>
   </filter>
   <filter-mapping>
      <filter-name>characterEncodingFilter</filter-name>
      <url-pattern>/*</url-pattern>
      <dispatcher>REQUEST</dispatcher>
   </filter-mapping>

</web-app>
위에서 beans태그 설정하는 부분은 XML을 알아야 한다고 하신다.
간단하게 설명해주셧는데
xmlns:class3="강의장3"
이렇게 설정을 해주면 bean 태그가 아닌 태그는 <class3:야리니></class3:야리니> 이렇게 사용해야하고
xmlns="강의장5mvc" 기본네임스페이스 설정을 하면 bean 태그가 아닌 것은 아래와 같이 사용할 수 있다.
<야리니></야리니>